| DVSwitch and DVLink are a pair of programs that will allow you to access DMR (and other modes) using just an Android cell phone or tablet and a Raspberry Pi - no radio or other hardware is needed. With proper firewall settings (Port Forwarding) the DVLink server can be accessed from anywhere in the world. |
| I had a bit of difficulty setting up DVLink and DVSwitch. What follows are some notes that I gathered that may help you in setting up the system. 99% of what follows was done by David Alvarez WA3LXD - |
| I set up my system to support DMR but it will work with a number of other modes. The basic system is composed of a Raspberry Pi 3b that has DVLink installed on it. Once set up the server is accessed from an Android app (for cell phone or tablet) called DVSwitch - on my phone it is called "DVSwitch Mobile") |
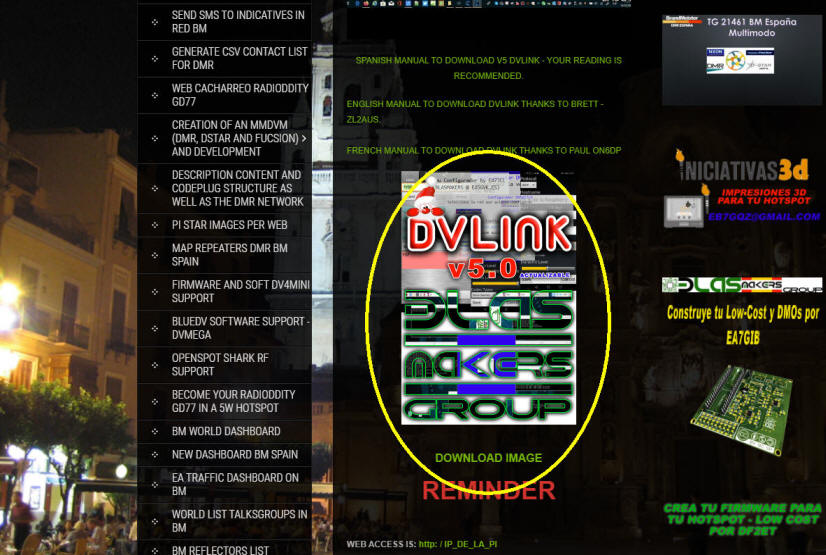
| The image file that goes onto the
Raspberry Pi can be found on this web page: http://ea5gvk-dmr.zigor.es/2019/12/17/v-5-imagen-dvswitch-y-hblink-blasmakers-bautizada-dvlink-llega-para-quedarse/ If you use Chrome as your browser it will offer to translate the page from Spanish. When you get to the above link scroll down and click on the circled link shown here:
Make sure that you are using Version 5.0 as other versions may not work. |
| Just above the DVLink download link is a
link for the English manual or you can click here:
https://mega.nz/#!a1RASIoS!0sxwTt2yW7svTfDc37HPqfiKoCDyIPdw2F0y4aPqPtg
to download it. The second half of the manual has details on
setting up DVSwitch. Please note: In DVSwitch you can set up macros to access commonly used functions and channels - you DO NOT need to press SEND after running a macro. |
| Once you have the image installed you can
complete the setup using VNC viewer which can be downloaded here:
https://www.realvnc.com/en/connect/download/viewer/
You will need the IP address of the Pi which can be found by opening a terminal window and typing ifconfig at the command line. the VNC login is pi and the password is ea5gvk |
|
THE MAJORITY OF THE NOTES BELOW
ARE FROM:
Dave
Alvarez: WA3LXD Quick Setup Guide DVLink Image 5.0 As of the date of these instructions the latest image version is 5.0. The program will auto update to version 8. A few technical notes prior to installation 1. Make sure your Raspberry Pie is supplied with a dedicated power supply specification 5.1V 2.5A 2. It is highly recommended to use Samsung EVO Plus 32GB SD cards for the image. Not all SD cards can stand up to the rigors of a server environment. The EVO Plus has leveling protection, and 32GB provides for large caches. 3. Partition the sd card fat32 4. Format the sd card fat32 5. Burn Image to SD card (Using Win32DiskImager.exe )
Steps to perform after image is running
Update image to version 8 by clicking on knife looking icon top left once each time.
Program will update one version at a time ie 6 to7, then 8. It will take 3 clicks of the icon. If in doubt of version click on system prompt >_ icon the name of directory sb pie@dvlink-V8 (Open Terminal and you should see this screen showing V8)
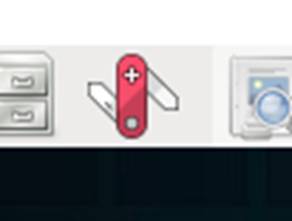
Reconfigure Raspian to English as follows: Upper left screen click on Raspberry Icon Select preferences (3rd up from bottom) Select Raspberry Pie Configuration (2nd up from bottom) Top tab menu select Localization (right most tab)
Then set all of the following as applicable; Set Local Set Time Zone Set Keyboard Set WiFi Country
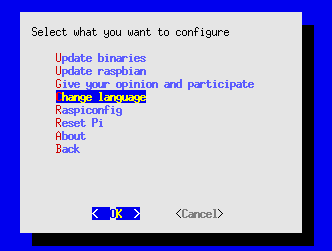
To change menu system from Spanish to English as follows:
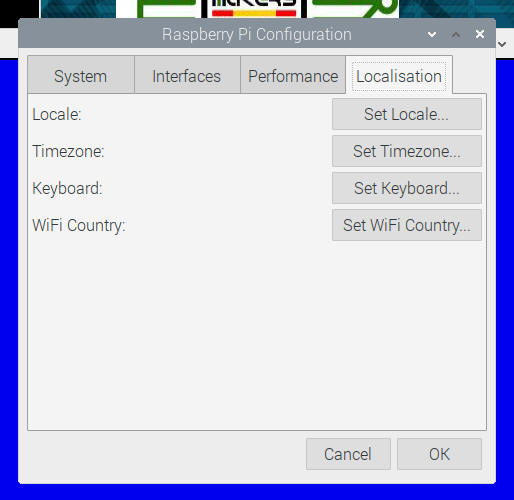
On main menu (necessary to bring up DV menu click on the icon that looks like a knife) select other options (bottom of list)
On next menu select the 4th option down
Then select the middle option for English
Go to the icon that looks like a knife upper left top of screen to invoke menu
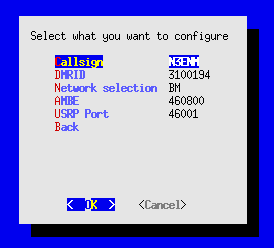
Time to enter your specific data
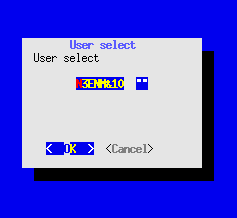
On main menu Select DVSWITCH On next menu select Personal User Configuration (Click past the first box that appears - after configuration it will show your call)
Enter call sign, dmr id, network selection s/b HBLink If you have Northwest Digital dv 3000 baud rate 460800
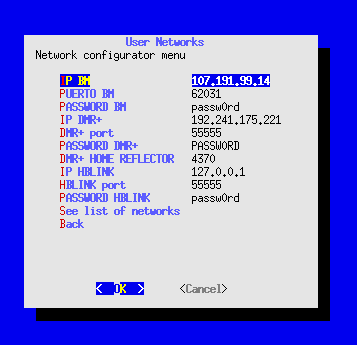
Now at the menu select User Networks
Change IP BM to 107.191.99.14 (I had to do this twice as the proper IP Address reverted to the original - double check yours) Port 62031
Change ip DMRPlus to 192.241.175.221 Port 55555
Change IP HBLINK to tgif.network HBlink port to 62031 Change password to: passw0rd (note enter numerical zero in lieu of letter o)
Click OK Click Back
Now click on Apply Settings
Note you can change to other server locations by selecting See list of Networks on the menu and noting the IP address and port number.
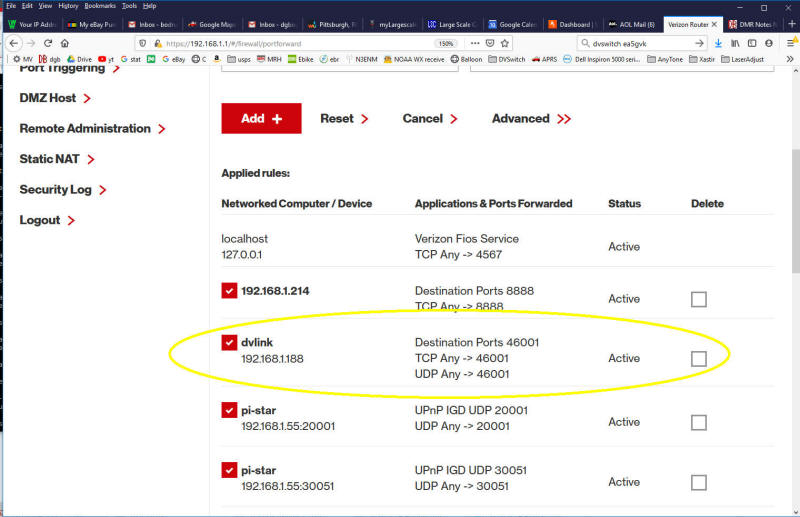
Don’t forget to port forward 46001 in your router to the network address for your network Raspberry Pie
Also use noip.com or equivalent dynamic dns service to allow remote access to the server.
You can edit these files using GUI editor (file cabinet editor next to knife icon upper left) by going to the directories and clicking on the file names as shown below or you can perform the edits at a command level by running the following commands that uses the nano editor.
Make sure the latitude and longitude values reflect your location as follows: edit file MMDVM_Bridge.ini otherwise your call as seen on aprs fi will be in the ocean.
sudo nano /opt/MMDVM_Bridge/MMDVM_Bridge.ini
Latitude=xx.xxxx (your location) Longitude=-xx.xxx (your location)
To change language from Spanish to English voice edit file
sudo nano /usr/local/etc/opendv/ircddbgateway change value for language= from a 7 to a 6
sudo nano /opt/NXDNClients/NXDNGateway/NXDNGateway.ini language=change es_xx to en_US
sudo nano /opt/P25Clients/P25Gateway/P25Gateway.ini language=change es_xx to en_US
sudo nano /opt/DMRGateway/DMRGateway.ini language=change es_xx to en_US
In order to optimize SD Card usage the following command at the system prompt enter
sudo raspi-config
then select 7 Advanced options then select A1 Expand file system
=========================================== DvSwitch Mobile app commands (enter then press send)
*AA reboots Raspberry pie *B=BM *C=TGIF *D=DMR Plus
Long press A to obtain mode change menu Long Press B to obtain talk group menu
To go to tgif 204 long press A, select DMR then enter *C followed by send, then enter 204 send
If your device does not have a key pad on the screen go to configure in dvswitch mobile app and enter the *C as a macro entry, and then 204 as another macro entry.
In the PAID only version of DvSwitch mobile you can enter a macro as a short cut in order to go to a particular talk group
For example
Go to config on DvSwitch moble app You will see MACROS You can overwrite the existing Macros by typing in the Name (your choice) and Dial string. For example to enter a macro for US Texas-Nexus give it a name and for the dial string enter; ysf.texas-nexus.dyndns.org:42000 (note this is the string that appears in the box when you select the talkgroup from the menu).
Go back to dialer, long press a select mode YSF then use the Macro dropdown box below the keypad and select the name that you chose above for the talk group.
Same as above for DSTAR example for reflector 30C enter REF030CL as dial string Same as above for DMR just enter the talk group number example 204 or 313665
73 Dave WA3LXD Rev D 1-17-20
|
| Port Forwarding On my Verison FIOS router I turned on Port Forwarding for both UDP aTCP as shwon here - the local IP address for the DVLink server is 192.168.1.188
|